
Talking Point
| Home |
| SoundBoard |
| Current Issue |
| Talking Point |
| Index |
| Subscription |
| Discussion Forum |
 This
article outlines some of the joys and pitfalls experienced by a complete
amateur in building an English bentside spinet from a kit. The kit has been
developed by John Barnes of Edinburgh and is supplied by Woods of Bradford.
It is a faithful copy of a spinet built by Stephen Keene in his London Workshops
around 1715. It makes little compromise to modern methods of construction
and copies the original in all major respects, including use of the original
types of wood.
This
article outlines some of the joys and pitfalls experienced by a complete
amateur in building an English bentside spinet from a kit. The kit has been
developed by John Barnes of Edinburgh and is supplied by Woods of Bradford.
It is a faithful copy of a spinet built by Stephen Keene in his London Workshops
around 1715. It makes little compromise to modern methods of construction
and copies the original in all major respects, including use of the original
types of wood.
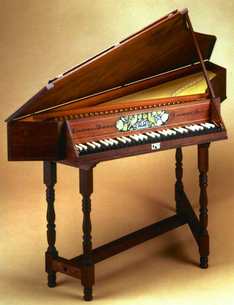
I have always enjoyed the sound made by early keyboard instruments. The plain plinkety plunk and the logical, almost mathematical music with which they are associated appeals to my scientific and logical mind. My first experience of listening to one was as a schoolboy at a boarding school. The resident music master kept what I now know was a virginal in his room. He always referred to it as a harpsichord, probably because if the adolescent male pupils had known that what he kept in his room was a virginal it would have caused some risqué humour. Favoured pupils were invited to this room for evening recitals. Although I was not amongst the favoured pupils, having little musical talent, some of my friends were. So I sneaked in with them. Despite this early interest in music I have never progressed beyond the stage of being able to play nursery rhymes or Christmas carols on any musical instrument. However, when I recently married for the second time at age fifty, as part of her dowry my wife came complete with a piano and the ability to play it. Even more exciting, her brother in Amsterdam owned a harpsichord, which rekindled some of my early love for the instrument. Our nearest music shop is Woods in Bradford, to which regular trips were now made to purchase sheet music. Whilst my wife browsed through the music, I spent the time admiring the various early keyboard instruments, trying to persuade my wife to play a tune for me and collecting various price lists. The problems in my mind were that the harpsichords were too expensive for us, and the smaller and cheaper instruments did not have quite the punch and sonority that I so admired. We consoled ourselves with the fact that, anyway, there would hardly be room in our house for a full-sized harpsichord as well as the piano.
Early in 1994 we noticed the appearance of a different instrument in Woods. This was an English bentside spinet, a copy of an instrument built in 1715. I had always thought that a spinet was small and rectangular in shape, but this one had strings nearly the same length as the harpsichord alongside. It was only single-strung, but then two people I know who own harpsichords only ever tune one set of strings, so that did not seem too great a drawback. Its tone sounded as full in the bass and as sustained in the treble as the harpsichord, which was promising. Because the keyboard is set at about 45 degrees to the strings it is more compact than the harpsichord and would perhaps fit in our house. But the greatest news was the price, which was only a little more than half as much as the harpsichords we had been considering. Several months passed whilst we wondered how we were going to save the necessary money; then a small legacy came to us and it seemed an ideal purchase to mark the loss of a dear colleague. One day found us in Bradford with some friends, so we arranged to call in at Woods to place an order for the spinet, thinking that delivery would take perhaps two or three months. To our amazement we were told that the spinet kits were stock items and we could take one with us now if we wished. A cheque was duly made out and accepted with little credit formality. The back seats of our small family estate car were folded down, and with the driver squeezed up against the steering wheel it was just possible to get the packing crate in. Our friends had to sit on top of the crate, but as it was made for export orders and substantially built, no damage was done.
And so on to the construction. The two questions I would have liked answered before I purchased were "How long will it take to build?" and "How difficult is it?". Neither question was answered for me, and even now that I have completed the building I am unable to give a precise answer. Building the spinet was a hobby, so I did not keep any records of how much time I spent working on it. What I can say is that from taking delivery of the box of parts to final completion took seven weeks. I am self-employed, and by chance there was very little paid employment to do during that time. It almost certainly took more than 250 hours and less than 400 hours. If I was to do it again, with the knowledge I have now gained, I would expect it to take less than 300 hours. I had no prior experience of instrument building or cabinet work. A look in my toolbox will reveal two blunt chisels for fitting doors into houses, some spanners for plumbing, wire cutters for electrical work, a heavy hammer and assorted screwdrivers. My power tools are a 225mm diameter circular saw, a jigsaw with a broken roller guide and a 20-year-old electric drill. I consider myself to be a competent DIY enthusiast around the house. I can put up shelves that do not fall down, plumb in a washing machine or provide a new mains electricity socket. I would not however consider it important whether a saw cut was made to the left or the right of a pencil line. In the event, despite the accuracy required in the building of the spinet, everything went together very well. If care and time are taken, no previous experience is needed. It will take just a little longer to complete.
The packing of the kit was superb. We prised off the lid of the packing crate to find the large parts inside held in place with mounting blocks, and the small parts all packed in polystyrene. The instruction manual was put aside for bedtime reading whilst we admired the beauty of the wood supplied and took in the delightful smell of the cedar. The spinet is a faithful copy of the original instrument and matches the original types of wood. The case is solid walnut, the wrest plank a massive piece of beech, internal linings are cedar, the keyboard lime with ebony key plates, the jacks pear, etc. The parts were ticked off the parts list and taken into what we rather fancifully call the piano room. It is quite a small multi-purpose room and houses an upright piano, a bed settee for guests, an office desk and a couple of chairs. This was intended to be the home of the completed instrument and moreover the temporary workshop. The empty packing case was nailed together again and set up across the arms of the bed settee as a low-level bench for assembling the bulk of the spinet. The office desk gained a sheet of 25mm blockboard to cover its surface. I also secured the blockboard to the wall to keep it steady. A small engineer's vice that clamped to the bench, a drill stand and a good desk light completed the set-up.
The first instruction in the instruction manual is to read the whole manual. This I did. Most things seemed fairly clear. Some of the terminology and names of parts took a bit of re-reading, but otherwise I felt that there was adequate information to explain every step in some detail. It was a bit worrying to discover that amongst the tools required I needed a block plane and a cabinet scraper, neither of which I owned, nor did I know what they were or how to use them. On enquiring the following day at my local village ironmonger it transpired that they did not stock such items but could obtain them within a week. The price of the block plane made we wonder whether I was about to tackle a bigger project than I had at first thought. I was offered 'Sandvick Sandplate' as an alternative of the 1990s. It transpired that this is an all-metallic version of sandpaper and available in three grades. Unlike sandpaper it has a glue backing and can be stuck to any shape of sanding block. The coarse grade removes material at a rate almost equal to that of a fine set plane, the medium grade at a faster rate than any sandpaper, but leaves a fine finish, and the fine grade almost polishes whilst still removing material. It was easily the most useful and most used tool, handy at every stage. All the other tools I already owned. A few special hand tools are required, but these are either supplied with the kit or there are instructions on how to make them from parts supplied with the kit. I managed without either the block plane or the cabinet scraper.
 The
next day I set about making jacks - the small wooden parts that pop up
and pluck the strings. At this early stage I encountered my first real
problem. The instructions referred to "the front" and "the
back" of a jack. Now this might make sense to anyone who has examined
the inner workings of a harpsichord but was not very informative to me.
By a process of elimination I chose a possible avenue of progress and
decided to make just one of the 58 jacks needed. There were two spares
anyway if I got it totally wrong. The first task was to drill a hole 0.65mm
diameter through the jack. Now I have drilled thousands of holes in my
life, but never anything this small. I have at least three boxes of drill
bits marked out from 1mm to 10mm. Why three? Well, all of them have the
drill bits smaller than 3mm missing as I have usually broken these on
about the fifth hole drilled, and the rest are blunt as I have never mastered
the knack of resharpening them. All the drill bits required to build the
spinet are supplied with the kit, but I could not imagine drilling 58
jacks without breaking a 0.65mm bit. The instructions were to clamp a
hand drill in a vice, and whilst holding a jack in one hand to offer it
up to the drill bit. Now my hand drill is rather old and not very well
made. Whilst the drill bit was rotating on its own axis it also progressed
through an orbit of about 2mm diameter in a sort of planetary action.
Ah well, this was only a trial run and there were two spares anyway. I
completed my first jack about two hours later. The author of the instruction
manual claimed to make ten in an hour!
The
next day I set about making jacks - the small wooden parts that pop up
and pluck the strings. At this early stage I encountered my first real
problem. The instructions referred to "the front" and "the
back" of a jack. Now this might make sense to anyone who has examined
the inner workings of a harpsichord but was not very informative to me.
By a process of elimination I chose a possible avenue of progress and
decided to make just one of the 58 jacks needed. There were two spares
anyway if I got it totally wrong. The first task was to drill a hole 0.65mm
diameter through the jack. Now I have drilled thousands of holes in my
life, but never anything this small. I have at least three boxes of drill
bits marked out from 1mm to 10mm. Why three? Well, all of them have the
drill bits smaller than 3mm missing as I have usually broken these on
about the fifth hole drilled, and the rest are blunt as I have never mastered
the knack of resharpening them. All the drill bits required to build the
spinet are supplied with the kit, but I could not imagine drilling 58
jacks without breaking a 0.65mm bit. The instructions were to clamp a
hand drill in a vice, and whilst holding a jack in one hand to offer it
up to the drill bit. Now my hand drill is rather old and not very well
made. Whilst the drill bit was rotating on its own axis it also progressed
through an orbit of about 2mm diameter in a sort of planetary action.
Ah well, this was only a trial run and there were two spares anyway. I
completed my first jack about two hours later. The author of the instruction
manual claimed to make ten in an hour!
 The
next step was a trip back to Woods to let them examine my sample and give
further advice. In any case I had already planned a business trip to Bradford
for later in the week. The staff were most helpful and demonstrated to
me how they make jacks using some beautiful and rather expensive-looking
tools. My jack was almost right. They were sorry about the lack of diagrams
in the instructions, but I was the first person to attempt to build from
this kit. Yes, they had sold several kits, but nobody seemed to have started
building yet, or if they had, no problems had been reported. In fairness,
this was my only visit to Woods. Everything else I was able to complete
using the instructions and drawings supplied. I am also told that some
diagrams of jack construction have subsequently been added to the manual.
The
next step was a trip back to Woods to let them examine my sample and give
further advice. In any case I had already planned a business trip to Bradford
for later in the week. The staff were most helpful and demonstrated to
me how they make jacks using some beautiful and rather expensive-looking
tools. My jack was almost right. They were sorry about the lack of diagrams
in the instructions, but I was the first person to attempt to build from
this kit. Yes, they had sold several kits, but nobody seemed to have started
building yet, or if they had, no problems had been reported. In fairness,
this was my only visit to Woods. Everything else I was able to complete
using the instructions and drawings supplied. I am also told that some
diagrams of jack construction have subsequently been added to the manual.
 The
case of the spinet took shape rapidly. This is basically a box with some
rather unusual mitred angles in it and one curved side. All the really
difficult bits of cutting the long mitred joints and steaming the bentside
has already been done. The pieces fitted beautifully. Internal braces
are fitted, and it is not long before you begin to get an idea of the
final shape and size of the instrument. I took a deep breath before attempting
to fit the soundboard. This is very thin, varying between 1.6mm and 1.8mm
in thickness. The instruction manual gives clear guidance on how to achieve
the varying thickness, and improbable as the methods might sound, in practice
they work well. Hitchpins, bridge pins and nut pins all have to be cut
from brass wire, filed square and then fitted. Some accuracy is called
for here. The geometry of a bentside spinet is more complicated than that
of a harpsichord. The keyboard is set at roughly 45 degrees to the strings.
The tuning pins and the nut pins are set approximately parallel to the
keyboard, whilst the jacks are obviously parallel to the strings and all
the strings are parallel to each other. A full-size drawing of the spinet
is supplied, and careful use of this, together with much forwards-and-backwards
checking, enabled me to achieve a good result. I know that one pair of
strings is slightly out of position, but the casual observer would not
be able to notice this and it does not affect the final playing or sound
of the instrument. There is some trimming of the case to do using mouldings
supplied. The curved pieces could probably be fitted without steaming
as they are relatively thin. I chose to give mine a little pre-bend by
poking them down the spout of a boiling kettle for ten minutes and then
clamping them around a dustbin lid whilst they cooled off.
The
case of the spinet took shape rapidly. This is basically a box with some
rather unusual mitred angles in it and one curved side. All the really
difficult bits of cutting the long mitred joints and steaming the bentside
has already been done. The pieces fitted beautifully. Internal braces
are fitted, and it is not long before you begin to get an idea of the
final shape and size of the instrument. I took a deep breath before attempting
to fit the soundboard. This is very thin, varying between 1.6mm and 1.8mm
in thickness. The instruction manual gives clear guidance on how to achieve
the varying thickness, and improbable as the methods might sound, in practice
they work well. Hitchpins, bridge pins and nut pins all have to be cut
from brass wire, filed square and then fitted. Some accuracy is called
for here. The geometry of a bentside spinet is more complicated than that
of a harpsichord. The keyboard is set at roughly 45 degrees to the strings.
The tuning pins and the nut pins are set approximately parallel to the
keyboard, whilst the jacks are obviously parallel to the strings and all
the strings are parallel to each other. A full-size drawing of the spinet
is supplied, and careful use of this, together with much forwards-and-backwards
checking, enabled me to achieve a good result. I know that one pair of
strings is slightly out of position, but the casual observer would not
be able to notice this and it does not affect the final playing or sound
of the instrument. There is some trimming of the case to do using mouldings
supplied. The curved pieces could probably be fitted without steaming
as they are relatively thin. I chose to give mine a little pre-bend by
poking them down the spout of a boiling kettle for ten minutes and then
clamping them around a dustbin lid whilst they cooled off.
Next the keyboard. Building this took me nearly a third of the whole building time. It could probably be reduced to a quarter if you had a fine electric bandsaw and a fixed electric sander, but it would still be a major part of the whole. I possessed neither, so all the work was done with a very fine hand saw and my trusty Sandvick Sandplate. The problem is that there are 58 of everything, and although no individual task is particularly difficult or time-consuming, considerable care is needed. My saw did slip once, and I have a slight nick in one of the keyplates. Woods have offered to supply me with a spare, but I have turned the offer down. You would not buy a real leather coat if you wanted a synthetic-looking plastic one with no marks or variations on it. I feel the same about my keyboard. The small nick is my mark to remind me that I made it.
The strings went on next. The tuning pins are supplied bright, with instructions on how to black them if you prefer. The instructions call for an electric or gas cooker ring to heat up the pins. We only have an Aga, a type of solid-fuel cooking stove. The pins went on the hotplate and the lid was closed over them. During the next twenty minutes of slow heating, the pins gradually went through various shades of blue and purple before reaching a deep matt grey. These were forced into their holes using quite a lot of brute force and resulting in a blistered finger. Now that I have fully strung all 58 notes I feel that I am beginning to acquire some of that knack. Maybe after a hundred strings I shall have mastered it. In the meantime, I have a spinet that sounds right and plays right, but some of the stringing probably looks a little untidy to the eye of a connoisseur.
Finally it was back to the jacks, which is where I had started. I set up for some serious batch production. It really was straightforward once you knew what you were doing. I never quite got up to the ten-an-hour rate given in the manual, but I came close. And the 0.65mm drill bit? I broke it on the 60th jack, so I ended up with the 58 I needed and the one sample I had made right at the beginning.
The inside of the case and the soundboard were given three coats of 'White French polish', rubbing down with fine wire wool between coats. At least, that is what I think it was. My knowledge of timber finishes stops short at Dulux undercoat and gloss. The walnut to the outside of the case and lid was given two heavy coats of linseed oil, well rubbed in with wire wool, and then two coats of 'Briwax', a petroleum-based wax, again rubbed in with fine wire wool. This has given a satisfying semi-gloss sheen to the whole instrument with very little work and little skill.
The spinet has not yet been given a full work-out by an experienced player, but I like what I have heard to date. To my amateur ear it has a very full tone, coming close to the harpsichords I know. Would I do it again? The motivation would not be the same, as this was partly a present from me to my wife. I did, however, thoroughly enjoy doing it. Some might say that I even became obsessed with it. Yes, I would do it again, but I might buy that bandsaw and sander first. They could not be economically justified as the time saving might only be twenty hours, but if I was to follow it up by building the harpsichord next ... and then the clavichord ....
Anthony Miskin
Rodmer Clough Farm, Colden, Hebden Bridge, West Yorkshire
Tell us about your
experiences of building from a kit! Leave a message on the website...