©BeeData www.beedata.com
- Nutshells
Go back - Click
here to print this page
MININUCS - THEIR MANAGEMENT AND
MAINTENANCE
By Brian Palmer
(Illustrations by Doug Hawkes)
|
©BeeData www.beedata.com
- Nutshells MAINTENANCE
By Brian Palmer (Illustrations by Doug Hawkes) |
|
Introduction
This booklet has been produced as a result of working experience gained at Kirchhain Institute and Hadlow College whilst operating a Bee Breeding project for the development of the Dark European Bee (Apis mellifera mellifera)
In any bee breeding programme it is necessary to raise large numbers of queens and drones. In queen rearing, where more than, say, a dozen queens need to produced and mated, use of the standard nucleus box is expensive and requires large numbers of bees.
The purpose of the mininuc or small mating hive is to maintain young queens economically, using a small number of bees, until the queens are proven and ready to be transferred to full colonies.
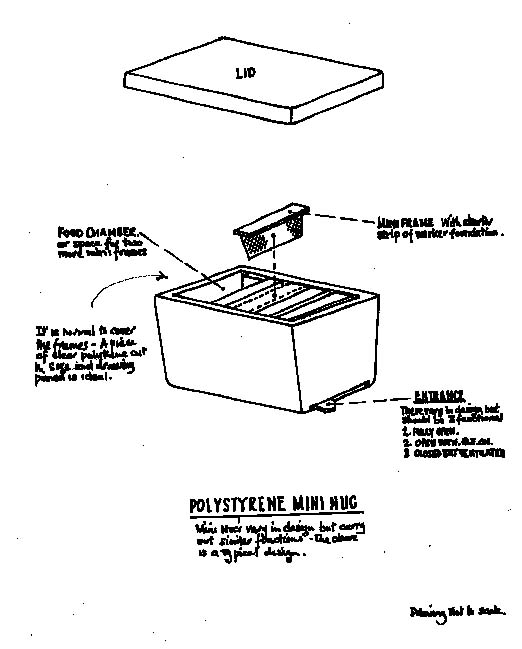
The mininuc discussed is the Kirchhainer, but most of the information is applicable to the Apidea and other similar mininucs. The Kirchhainer (see illustration) is a top-bar box made of high density polystyrene. The sides slope inwards vertically in order to prevent the bees from sticking the combs to them. There is provision for six combs or four with a division board to allow for a feeder. The entrance is underneath the hive. There is no crown board. In order to prevent sticking of combs to the roof, a sheet of polythene should be pinned across the top of the box. The Apidea is square-sided, and made to take six plastic frames, or four with a division for the feeding area. The rectangular shape enables a number of hives to be transported easily. The entrance is at the front.
The entrance to the mininuc will need to be guarded with queen excluder, if Instrumental Insemination is to be used.
PREPARATION
The Kirchhainer mininuc top bars will be furnished with 2.5cm (1"), starter strips of foundation or pieces of comb taken from healthy colonies. Molten beeswax is used to attach the strips.
Four bars will be used initially, with a division board separating the food compartment. The remaining two bars will be added subsequently.
A supply of food will be needed at all times. The recommended food is queen candy, made with icing sugar and honey. Alternatively, bakers fondant or sugar syrup can be used. (See Appendix I).
Each mininuc will be clearly identified by number and a colour the bees will recognise. The colour is needed only at the front. The number is best placed at back and front, or at the back only. Recommended colours are green, white, blue and yellow. The numbers should run through the colours in sequence, ie, I-G, 2-W, 3-B, 4-Y, 5-G, 6-W, 7-B, 8-Y, etc. Colours can be replaced by shapes. (See Von Frisch). | ||
| |
|
The polythene inner cover is attached with two drawing pins at the front top edge of the box.
STOCKING
If the cell raising stock is not needed again, bees from this can be used directly at the same time as the transference of the queen cells. The bees will need to be gathered into a suitable box, which will enable them to be scooped into the mininucs with minimum wastage.
If bees are taken from other colonies, they should be put into a well-ventilated box one day prior to the transference of the queen cells and left in a cool, dark place, so that they recognise their queenlessness before joining the queen cells in the mininucs. (See appendix II).
Lay out the mininucs in numerical order with lids removed, together with two of the top bars. The entrance is closed and ventilation open. Divider and food are in place.
A queen cell from the cell raiser is fixed between the two remaining top bars.
Bees are consolidated in the gathering box by knocking the box downwards. The bees are sprayed with water prior to dispensing. This water stops the bees flying and is useful to them when they are confined.
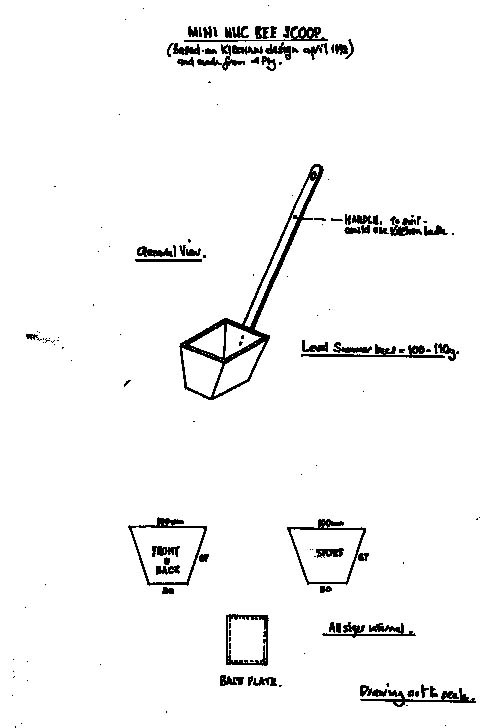
A minimum of 300 bees, approximately 1/3 litre or 120 grams, are dispensed into the mininuc. A honey jar contains about 1/3 litre (A suitable dispenser is illustrated. A level measure contains approximately 100grams. A heaped measure contains approximately 120 grams).
The other two top bars are replaced and the mininuc quickly closed.
When all the mininucs are stocked, they are stacked in a cool, dark place for THREE days. Make sure that all entrances are properly closed.
SITING
After three days in the dark, the mininucs can be placed on site.The bees will re-orientate to the new site. If transportation to a mating site is required, they should be allowed to fly for a day. During this time a check can be made on emerged queens. This inspection is best done when queens are not flying, ie. early morning or during the evening.
The ideal mating site has an open aspect and is protected from the wind. Large colonies should not be in close proximity.
Stands should be provided, for ease of manipulation. A strap should be attached to the stand. This can be pulled over the mininuc, to hold it in place, Lorry tyre inner tubes make good straps. Strips 2.5 cm (1") wide are cut to the required length and stapled onto the stands. | ||
|
For natural mating, the stands should be placed at least 3 metres apart and preferably not in rows. Mininucs should face different directions. Colours should be mixed, preferably in numerical order, for recording purposes.
For lnstrumental Insemination, mininucs can he placed in rows on stands, in colour and numerical order. These queens will not fly at any time during their stay in the mininucs.
UPKEEP
Ideally, inspections should be made at least once a week, preferably when queens are not flying.
First inspection
Check for food. If syrup is used it may be better to check more than once a week in bad weather. Queen candy and fondant are not consumed as quickly. Ensure an adequate amount of food is left in feeding compartment.
Check that the queen has emerged, and that there are sufficient bees. Queens can be marked. (For I.I. only, a wing can be clipped).
Second inspection
Check food and look for eggs. If necessary, remove divider and add the other two bars. Check that the queen is there and alive, if there are no eggs.
Third inspection
Check food and eggs/larvae and possibly sealed brood.
Fourth inspection
Sealed brood should be evident. Make initial assessment of queens.
N.B. Matings can be delayed due to bad weather. If there are no eggs after a month, in normal circumstances, a failure may be assumed. If all is well, the queen can be introduced to a nucleus or queenless colony. Or the mininuc can be united to a queenless stock.
UNITING AND QUEEN INTRODUCTION
If the mininuc is not to be used again, it can be united to a queenless stock. The crown board of the queenless colony is removed, a sheet of newspaper is then placed over the roofless mininuc. A few small holes are punched in the paper. The mininuc is then inverted over the top bars of the receiving colony. Leave for one week, then check that uniting is successful. After uniting, the queen may still be in the mininuc. She may be placed gently on the top bars of the receiving colony and allowed to run down. | ||
|
The Apidea mininuc floor is removed over the sheet of newspaper.
If the mininuc is to be used for subsequent queens, the mated queen can be caged and introduced to a colony or nucleus, using any generally accepted method. One day later, a ripe queen cell can be introduced to the mininuc, after having destroyed any queen cells the bees may have produced.
RECORDING
Simple records should be kept. Dates of all operations, inspections and progress to maturity of new brood are necessary. For I.I., more meticulous records are needed.
WINTER WORK
Mininucs should be dismantled, scraped clean and washed with hot water.
For Nosema disease and wax moth control, all combs can be treated with acetic acid. Combs are best placed in plant troughs of suitable size and covered with cling-film for this purpose. Alternatively, polythene bags could be used if care is taken not to damage the combs. Do not use acetic acid in mininucs. All sound combs can be re-used the following year.
To kill all stages of wax moth, mininucs with combs, but with roofs removed, can be frozen for a day. A deep freezer at -18 deg C. is ideal.
If PDB is used for wax moth control, DO NOT use it in mininucs, or it will be absorbed, and kill bees thereafter.
Finally, reassemble, checking all parts and replacing where necessary. Store in a clean dry place.
APPENDIX I - FEEDING
Mininucs need feeding at a rate which will avoid starvation, yet will not produce food-bound combs, which will limit the space available for egg laying. Little and often is the way.
The following can be fed to bees in mininucs:
a) Strong sugar syrup b) Baker's fondant c) Queen candy
Queen candy is preferred. This is made by mixing together approximately 3 parts icing sugar and one part of liquid honey to make a dough-like paste. Add the honey to the sugar gradually, while mixing. The mixture is separated into small lots and wrapped in cling-film. Store in a cool dry place. Use only honey from your own bees. The domestic food mixer will not cope with large amounts of candy. A baker's kneading machine with a dough hook will cope with large quantities. | ||
|
Sugar syrup, although probably the cheapest option, is consumed and stored more quickly, and needs replenishing more often. Strong syrup, as for winter feeding, must be fed in containers with floats, to obviate drowning bees. Plastic drinking cups, filled with small pieces of foam plastic, are ideal. Two cups will fit into the feeding compartment.
Baker's fondant is used in the same way as queen candy, but is not as nutritious.
APPENDIX II - COLLECTION OF BEES
Young droneless, queenless bees are required to stock a mininuc. Bees can be gathered from many healthy colonies, since their odours will mix as they are thrown together. A rough quide as to amounts of bees needed is about one full comb of bees per mininuc, with a little more to allow for losses in transfer.
Equipment: A large ventilated box with a top which will accommodate a large funnel fitted with a queen excluder. The swarm box used for queen cell starter colonies will suffice for up to, say, two dozen mininucs. The Marburgher nucleus box, with funnel on one side, is also suitable.
Shake bees from combs into funnel. Cover with a cloth until bees are in the box. Then repeat the exercise until sufficient bees are thought to be gathered. Remove funnel and close box. Place in a cool, dark place for 24 hours. Provide a liquid feed of thin syrup.
A purpose-built collecting box comprises an outer box, into which the bees and drones are thrown. A smaller box, whose base is queen excluder, is lowered onto the bees. Workers then move upwards through the excluder, leaving the drones behind.
For further reading see " Breeding Techniques and Selection for Breeding of the Honeybee" by Friedrick Ruttner. Published by BIBBA. | ||
 Go back - Click here to print this page | ||